🌟 This feature is included in the STARTER Plan and up
With this integration, you can connect Microsoft Planner to Lucen Track and track time for your tasks seamlessly, either within Lucen Track, or in the Microsoft Planner interface.
How does the integration with Microsoft Planner and Lucen Track work?
When the integration is correctly set up, you'll be able to:
-
Import new plans in Microsoft Planner in Lucen Track reducing the manual work you have to do;
-
Track time for your Microsoft Planner tasks.
- Sync tags, project membership, and project information to keep workflows updated without any effort.
A note on Terminology
Lucen Track and Microsoft Planner use different terms for the same elements. For example, Lucen Track uses projects, phases, and tags, while Planner uses plans, buckets, and labels.
Here’s a quick reference to help you follow along in this article:
-
Lucen Track Project = Microsoft Planner Plan
-
Lucen Track Phase = Microsoft Planner Bucket
-
Lucen Track Tag = Microsoft Planner Label
Let's begin!
⚠️ PLEASE NOTE: for this integration to work properly, please remember that all of your team members have to authorize access to the plans they're part of.
For more information about authorizations, please see the guide below.
Connect Microsoft Planner and Lucen Track
First, the Owners of the workspace have to connect the integration.
1) Go to Integrations>Microsoft Planner;
.png?width=670&height=337&name=ms%20planner%20integration%20(1).png)
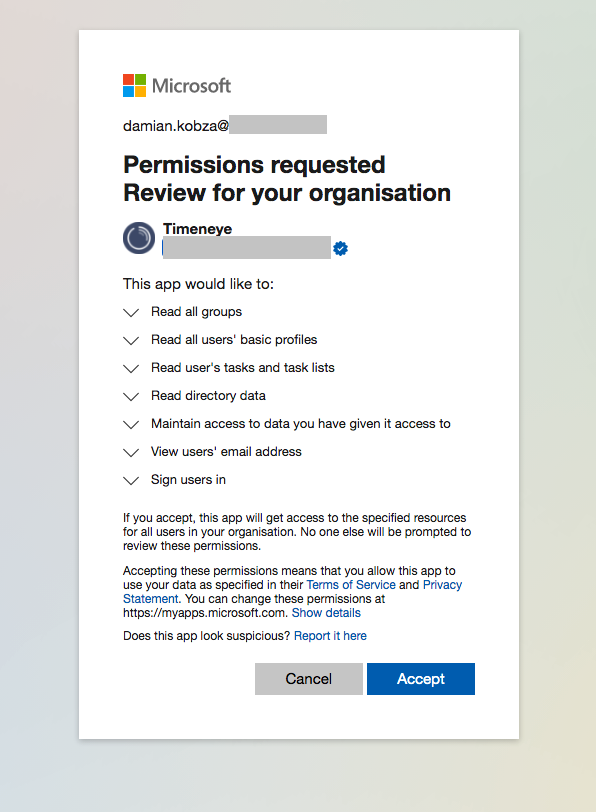
2) Click the green Approve Microsoft Planner integration button;

3) When you click the link, you will be asked to log in to your Microsoft account and approve the integration. Click "Accept". You'll only need to complete this step once to approve your integration (unless you or your Microsoft account admin revoke the permissions);
4) Congratulations! The integration has been correctly linked.
The first time, it might take up to 30 minutes to see all your projects imported into Timeneye

(If needed, you can refresh the authorization at any time by clicking the “Refresh Authorization” button.)
👉 Here comes a very important step that will allow you to experience a full integration between Microsoft Planner and Lucen Track. This is the part where all the rest of the team members have to authorize the integration for it to work properly
If you're a user who has to grant authorization to access your plans:
-
Go to Integrations >Microsoft Planner. Look for the green Authorize button:

- Click the green Authorize button.
And that's it! You won't have to do anything else. From this section, you can refresh the authorization, or revoke it if needed.

If you are an owner waiting for your team members to grant you authorizations:
You can check the status of all your team's authorizations by clicking the User section in "Manage".

By clicking the blue "Manage" button in the user's box, you can see the status of the team members' authorizations and check which are still to be authorized.
Please note: Owners cannot manually unlink a user from the integration. A user will only be unlinked if they revoke their authorization.
Import Projects, Tasks and more!
Now that all the permissions have been granted, it is time to import projects and tasks.
You have the option to import projects and tasks automatically through your Synchronization settings. By simply enabling the "import projects automatically" and "import tasks automatically", the system takes care of everything for you.
These and the other settings are enabled by default, but you can turn them off anytime.
.png?width=670&height=335&name=Sync%20projects%20tasks%20(1).png)
For a detailed explanation of synchronization settings and how they work, please see the next chapter.
In the Manage section, you can always check the status of your projects, see which projects are correctly synced, and unsync projects if necessary.

Synchronization settings
The Synchronization section lets you customize automation settings to create the ideal workflow between Lucen Track and Microsoft Planner.

Here's a handy recap of all the settings available and how they work:
-
Import Tasks automatically: imports tasks from Microsoft Planner into Lucen Track. When disabled, new changes to tasks will not be synced, but existing ones will still remain;
-
Import projects automatically: imports Microsoft Planner plans as new projects in Lucen Track. Only projects that do not have other projects with the same name in Timeneye will be imported. If disabled, no new projects will be created automatically.
-
Import tags automatically: imports tags from Microsoft Planner and assigns them to the imported tasks. If disabled, the tags will be archived, no longer synced, and removed from the imported tasks. Please note: tags are only synced in Basic plans. Syncing tags for Premium plans is currently not possible.
-
Update projects automatically: this allows imported projects and their data to be periodically synced from Microsoft Planner. When this is disabled, new projects can still be imported (if the automatic import is still active), but they won’t sync.
-
Import phases automatically: If enabled, import and sync the buckets of the plans as phases in Lucen Track. If disabled, new buckets won’t be synced as phases, and updates to existing ones will be ignored, and new projects will be created with a "General" phase.
-
Update project membership automatically: If enabled, users who have authorized integration will automatically be added to Microsoft Planner projects they can access. If disabled, users won’t be added to new projects from Planner, but existing project membership will stay the same.
Track time on your projects
Now, in the project section, you will find all the imported projects. By clicking on the project name, you will be directed to the project detail page. Here, you can get an overview of the time tracked, the team members associated with that project, the buckets imported as phases, and the labels imported as Tags.
Existing projects are synced every 15 minutes. If you don’t see the changes you made in Microsoft Planner reflected in Lucen Track, you can manually force a sync by clicking the "Sync Microsoft Planner Data" button in the top right corner of the project detail page.

For newly created projects, it might take up to 20 minutes before seeing them in Lucen Track
In the Task section, you can easily monitor your progress in two views: List or Board.
To start tracking time on any of these tasks, simply click the Add time button. The Register Time will already be filled with the correct information. Then, hit "start timer" to activate the timer for that task.

Otherwise, move to your Dashboard and open the Register Time dialog from there. Make sure you select the project, the phase, and the task you would like to track time for.
Important: This is not a two-way sync integration. To edit your Microsoft Planner tasks, you must return to Microsoft Planner. However, all changes will be reflected in Lucen Track, keeping both platforms in sync at all times.

Track time on your Tasks
Additionally, you and your team can easily access your tasks from the Assigned to me section on the right sidebar.

Otherwise, check out our brand new Tasks section to easily monitor your progress, deadlines, and priority, boosting your productivity.

The Lucen Track Browser widget
If you’d rather track time directly inside MS Planner instead, you can easily do so by installing the Lucen Track Browser widget.
First, navigate back to the dedicated Integrations section for MS Planner.
You can download and install the Lucen Track widget for:
In order to make things easier for you, we highly recommend pinning the Lucen Track widget to your browser extensions before proceeding.
Now, log in to MS Planner through the Lucen Track browser widget.
You will notice that time-tracking controls have appeared next to each task. If they don’t appear automatically, please try refreshing the page.
![]()
To track time on your task, simply click the blue button to open the register time dialog.
When you track time (or start a timer), the widget retrieves the name of the task you have worked on, and you will find it in the time entry you have created.
This is what it will look like in Lucen Track:

Any changes you make in Lucen Track will be instantly displayed in MS Planner, ensuring seamless synchronization and up-to-date time reports.
Lastly, when generating a report, you have the option to add a widget that provides a comprehensive overview of your tasks. This widget allows you to easily identify the team members involved, the duration of their work, and the financial value tied to each task.

FAQs and Troubleshooting
Need help with the Microsoft Planner integration? Maybe you can find answers here:
FAQs:
- What happens if I disable the Update projects automatically option?
When enabled (default), projects, imported tasks and tag, will sync automatically, but disabling this option prevents any further syncing while still allowing time tracking on active projects - What happens if I unlink the Microsoft Planner Integration?
Unlinking the integration just pauses syncing and archives the projects instead of removing them. If you reconnect it later, everything members, tags, tasks, and phases are synced back again. - Do I need to connect the integration and download the Browser widget?
Yes, we recommend doing both to get the best, most complete experience for your workflow.
Troubleshooting:
-
"I downloaded the Lucen Track widget but still do not see the Lucen Track button in my Microsoft Planner."
Ensure to also log in to the widget: click the Lucen Track icon on your browser, and log in to the widget with the login form. Then, refresh the Planner. -
"Some Plans have not been imported."
Some users may still need to authorize access to these Plans. You can check by clicking the Users box, and identifying which users still need to grant authorization. -
"All my users have granted access, but I still don't see some plans."
Make sure to import the plans as projects, too. You can do it with the Synchronization settings. You can always check how many projects remain unsynced from the Projects box in "Manage". -
"I connected everything, but I don't see any button to track time in my Microsoft Planner"
Please make sure to download and install the Lucen Track Browser Widget too.
If you are still having trouble with the integration, please do not hesitate to send us an email at track-support@lucensoftware.com
To see the integration in action, watch this two-minute video: