How to select a start and end time for a Time entry
Learn how to track time with a specific Start and End Time, thanks to Timeneye's Timeline view
The Timeneye Dashboard lets you visualize the distribution and the duration of the time entries, through the colorful time cards. Some users prefer to visualize the start and end time of a Time entry. This is useful not only for personal organization and productivity, but also in cases in which users need to keep track of overtime.
By default, Timeneye lets users enter the duration of the time. To activate the from/to visualization, you must activate the Timeline feature.
How to turn the Timeline view on and off
Users who registered prior to May 2025 will find this feature enabled by default. Below are the steps for managing this feature, which can only be accessed by Owners:
- Go to the Settings section of the workspace;
- Access the Features tab;
- Scroll until you find the Timeline feature and turn it on.
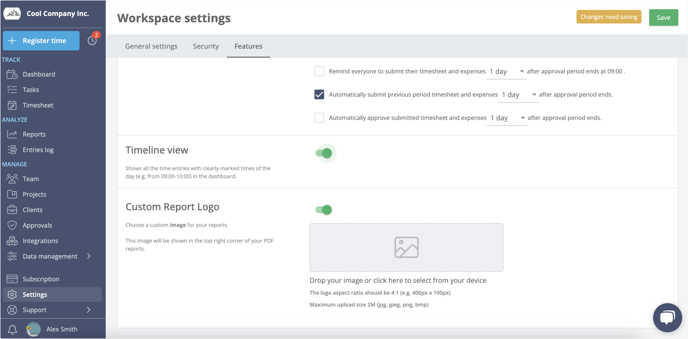
Please note that owners can turn this feature on globally, which means it will be activated for the whole account.
How to enter the start and end time of a time entry
On your Dashboard, look for the Timeline view:
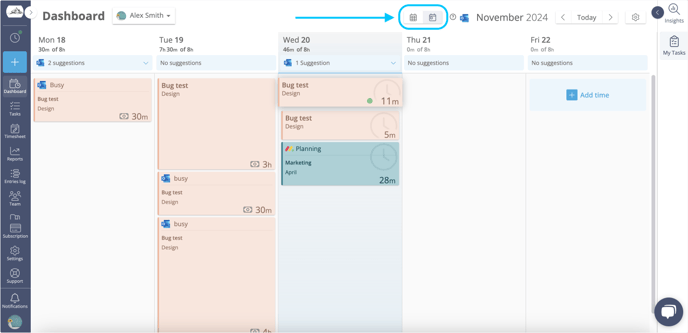
You'll see the Dashboard switch to a more calendar-like appearance, with all the hours clearly marked on the left side:
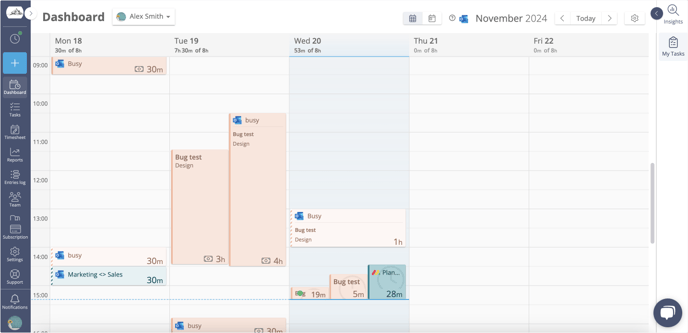
To register the start and end time of your entry:
- Either click the Register time dialog, or double-click on a specific date on a calendar;
- On the top, enter the "Start" and "End" time of your time entry:

- As always, make sure to select the Project and Phase the entry belongs to. You can also add additional information like assigning tags, adding notes, and selecting a specific task.
- If you click Save entry, the time will be immediately saved on the dashboard. If you click on Start a timer, you'll see the active timer appear in the time slot that you have entered.

PLEASE NOTE: when you're using timers in the Timeline view, it's not possible to pause and resume a timer. You'll have to save it as an entry, and if you need to start working on the same time entry again, you'll have to create a new one.
How to edit an Entry in the Timeline view
To adjust the start and end times of a time entry, simply drag it to different hours on the calendar. You can also change its duration (and, by extension, its end time) by dragging the bottom-left corner of the entry card.
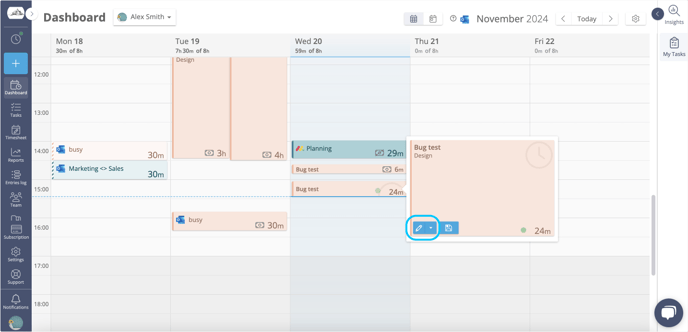
If you need to edit other details, such as the project or phase, you need to use the edit mode. The timeline view has limited space, but you can click on the individual time card to see all its details (project, phase, notes...). To edit any of those fields, click the pencil icon to access the full edit mode.
If you need to edit additional details, such as the project or phase, you can do so using the edit mode. Simply click on an individual time card in the Timeline view to access all its details, including the project, phase, and notes. To make changes, click the pencil icon to open the full edit mode.
Keep in mind that if a time entry has specific "Start/End" hours set, changing its duration will automatically update the "to" time. Be sure to double-check the end time after making changes to ensure it’s set exactly as intended!
Where to see your Time-stamped entries
In the Entries log
As you scroll through the list, you'll see all your saved time entries, including those created using the Timeline view.
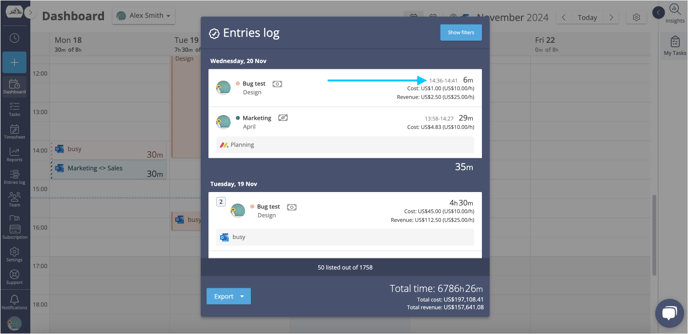
If you've started multiple timers in the Timeline view for the same project and phase, Timeneye will conveniently group them together, allowing you to view them all at once. A small number next to the entries’ name will indicate how many timers you’ve tracked for that specific project or phase. To view the details, simply click on the number to expand the grouped entries.
.png?width=688&height=334&name=timeline%20entries%20(1).png)
In the Reports
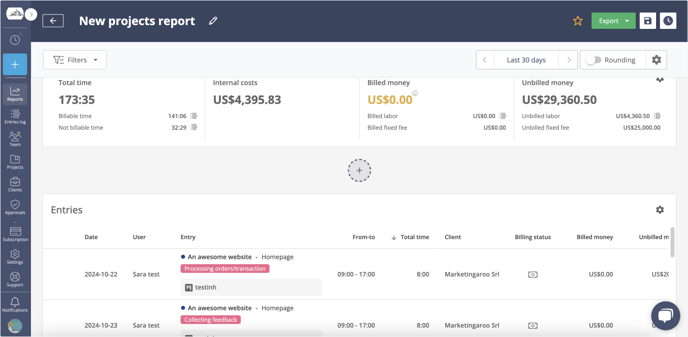
When creating a new report, the Report view offers the option to add an Entries section. Click the "+" button to include it. Depending on your needs, you can add a variety of sections. If you choose to add an Entry widget, you'll notice a new "From/To" column added next to the entries:
